Wednesday, January 27, 2010

Babies


Heavenly Father really knows what He is doing, these babies are impossible to resist.


Each time I look at my sweet baby, my heart fills to the brim with love.  There is so much to do in this fine home of mine, but all I really want to do is hug, cuddle, tickle, and make him laugh.


The questions I have asked myself in the past few years, of the purpose of certain trials, seem to be answered.  This is my answer.  I now know how precious life is.  I understand better to appreciate the moments of life.  I now understand that creating life and keeping it, isn't as easy as I once thought.  


Frustration comes much slower these days, and joy stays longer.


Life is beautiful.  
Love is precious.
Babies Rock!

Tuesday, January 19, 2010

Classic Pics 1


This picture caught my eye yesterday while it was scrolling through our screen saver. Take a look at Liz (top right). I love it!!!! This is Liz with her soccer team last year. I only took 25 million pictures of the team. And, as I scroll through them, I see a story emerge. I wish I could show the 20+ picture progression to this moment. You would see this little boy, continually trying to hold her hand, and Liz continually trying to pull her cute little hand away. By this moment, she'd had it!

LOVE IT!

Thursday, January 7, 2010

Aging Tutorial

I have had more than one request for a tutorial on how I made the temple pictures. It was not too complicated, if you have a general idea of how photoshop works.

Step 1. Download actions from thepioneerwoman.com and find textures to use. You can download some from here.

Step 2. Use the vintage action from the pioneer woman. Now, play with the opacity, I used about 77% opacity. Each picture is different, each project different....so choose what you like best.

Step 3. Evaluate the picture. Do you like it as it is now? Does it need to be more defined, softer, etc.... Play with the different actions. I used the boost action on some of the photos, and other actions on other photos. Play around until you like your photo as it is. We will be adding textures, but they will just enhance the photo, not MAKE it.

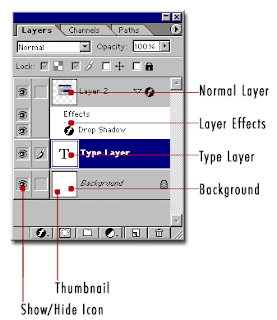
Step 4. Here's some fun info. Do you see the little eye on the side of each layer? This is the show/hide function. Turning it on and off let's you see the difference the layer makes for the photo. Play with this one!

Step 5. Start adding layers. Open up the textures you would like to use. Drag them onto your photo, and stretch or shrink them as needed, to fill the photo.

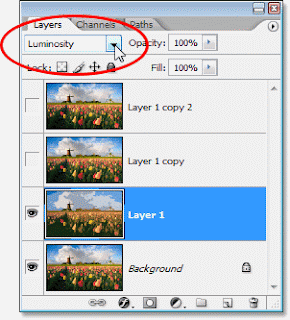
Step 6. Use the blending modes feature (as shown in the circle below), and pick the soft light blending mode.

Step 7. From here, just add new textures (continue to use the soft light blending mode), and keeping playing until you find the composition you like. Play with the opacity of each layer, adjust to see the difference it makes.

Step 8. Add text . Use the text button, and add the text. I used three different layers so I could have the most control of how it "flowed." I also used the font, Hannibal Lecter.

Step 9. Save as a JPG to have it printed.

Hopefully this helped, have a happy photoshop day.

Today

Today started out looking like this.....
piles and piles of clean laundry. We all love clean laundry, but I showed you just one corner of my couch. The whole blessed couch was filled with kids clothes today. Now, they are safely nestled in the kids laundry baskets waiting for the kiddos to put them away.


Then I got this in the mail.....
My spirits soared. Here it is. What I have been waiting for. The slightly finished product. My book. Is this real? This is the proofing stage, but lo....can you see all the illustrations, photos, etc.? How fun. The layout is done, the photos taken, and I love it. I was slightly nervous to see how a third party would view my style of work. They got it! It is bright, cheerful, and modern. I am loving Martingale. The only thing I would change is some fonts....but really, that doesn't matter. What a happy addition to a perfectly normal and chore riddled day.

Monday, January 4, 2010

How to add text to a photo

Adding text to a photo is pretty darn easy, but if you have never used photoshop or photoshop elements before, it might be something new, and thus, confusing. So, for those of you who would like to customize your temple photos (or really any photos) please follow this link, and it will give you directions for adding text to a photo.

Tips for text

I used the font, hannibal found here, for the the title.

I also used a brown type color, and played with the opacity of the font to let some of the distressed stuff come through. How to use opacity? Go here.


Saturday, January 2, 2010

Temples


Some years ago I was slowly decorating our new home. I wanted to have a picture of the temple to display in my home. The only problem....many of the pictures of temples were (how to say this kindly)...corny. Eventually, I found a beautiful picture of the SLC temple, and I paid dearly for it. And, I still love it.

I have often looked at this picture, and known I could do something in Photoshop that would be (to me) just as good, and sooooooo much cheaper. This year for Christmas, I decided to do a temple theme, and give large framed photos of temples to family members. I have really enjoyed seeing how a simple picture of the temple has transformed into something I love. As neighbor gifts loomed before me, I realized I could do the same thing for them, just on a smaller scale (of course, my neighbors who aren't LDS got something a little different).

Being the cheapskate, I mean thrifty person I am, I wanted to share these with you. I have the Mesa, Seattle, SLC, Albuquerque, and Columbia River temples done. I have a group set up on Costco.com which has all the photos of temples I have altered, ready to order. If you would like to be invited to the group, let me know your email, and I'll invite you. The only catch is you must only use these for personal use.

Happy New Year!